Introduction
Mainly for the vulnerability scanning framework of network cameras, it has integrated common equipment such as Hikvision, Dahua, and Uniview. More camera devices and router devices will be added later.
Install
Windows still has some bugs, Linux and Mac can be used normally. Please make sure to install Python 3.7 and above, 3.8 is recommended
- Clone this repository:
git clone https://github.com/jorhelp/Ingram.git
- Enter the project directory to install dependencies:
cd Ingram
pip3 install git+https://github.com/arthaud/python3-pwntools.git
pip3 install -r requirements.txt
So far the installation is complete!
Run
- You need to prepare a target file, such as target.txt, which saves the IP addresses you want to scan, one target per line. The specific format is as follows:
# You can use the pound sign (#) to comment
# single IP address 192.168.0.1
# IP address and port to scan 192.168.0.2:80
# IP segment with ‘/’ 192.168.0.0/16
# IP segment with ‘-‘ 192.168.0.0-192.168.255.255
- After that run:
python run_ingram.py -i “the file you want to scan” -o “output folder”
- Port: If the target’s port is specified in the target.txt file, for example: 192.168.6.6:8000, then the target’s port 8000 will be scanned Otherwise, only common ports are scanned by default. If you want to scan other ports in batches, you need to specify them yourself, for example:
python run_ingram.py -i “the file you want to scan” -o “output folder” -p 80 81 8000
- The default number of concurrency may be so easy for your broadband, you can increase it appropriately according to the network conditions. For example, on my test machine, increasing the number of concurrency to 800 still works well, and the speed is extremely fast:
python run_ingram.py -i “the file you want to scan” -o “output folder” -t 800
- Other parameters:
optional arguments:
-h, –help print parameter information
-i IN_FILE, –in_file IN_FILE file to scan
-o OUT_DIR, –out_dir OUT_DIR Scan result output path
-p PORT [PORT …], –port PORT [PORT …] The port to scan, you can specify multiple ports, such as -p 80 81 82
-t TH_NUM, –th_num TH_NUM The number of concurrent, adjusted according to the network conditions
-T TIME_OUT, –time_out TIME_OUT time out
–debug debug mode
- (Optional) The scan time may be very long. If you want to send a reminder via WeChat when the program scan ends, you need to follow the instructions of wxpusher to get your unique UID and APP_TOKEN, and write them into run_ingram.py :
config.set_val(‘WXUID’, ‘这里写uid’)
config.set_val(‘WXTOKEN’, ‘这里写token’)
- Interruption recovery is supported, but since the running status is recorded every 5 minutes, it cannot be accurately restored to the last running status. (It’s rough here, it will be adjusted in the next version)
Result
.
├── not_vulnerable.csv
├── results.csv
├── snapshots
└── log.txt
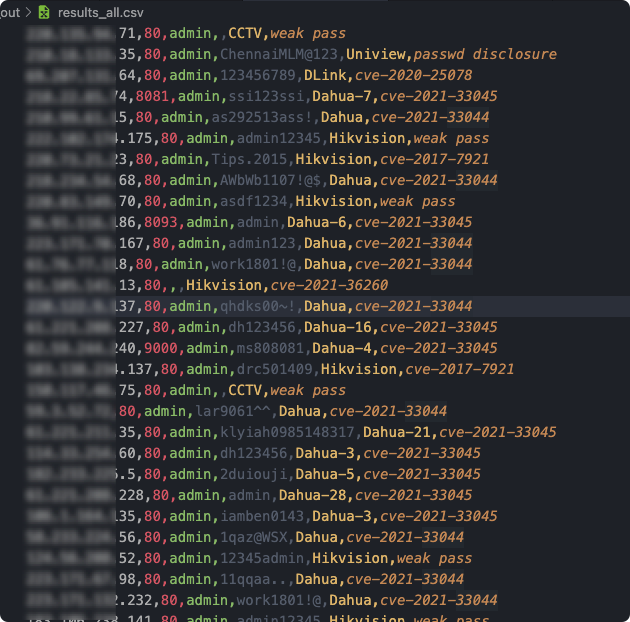
- results.csv The complete result is saved in the format: ip, port, device type, username, password, vulnerability entry:
- not_vulnerable.csv Saved in the device is not exposed
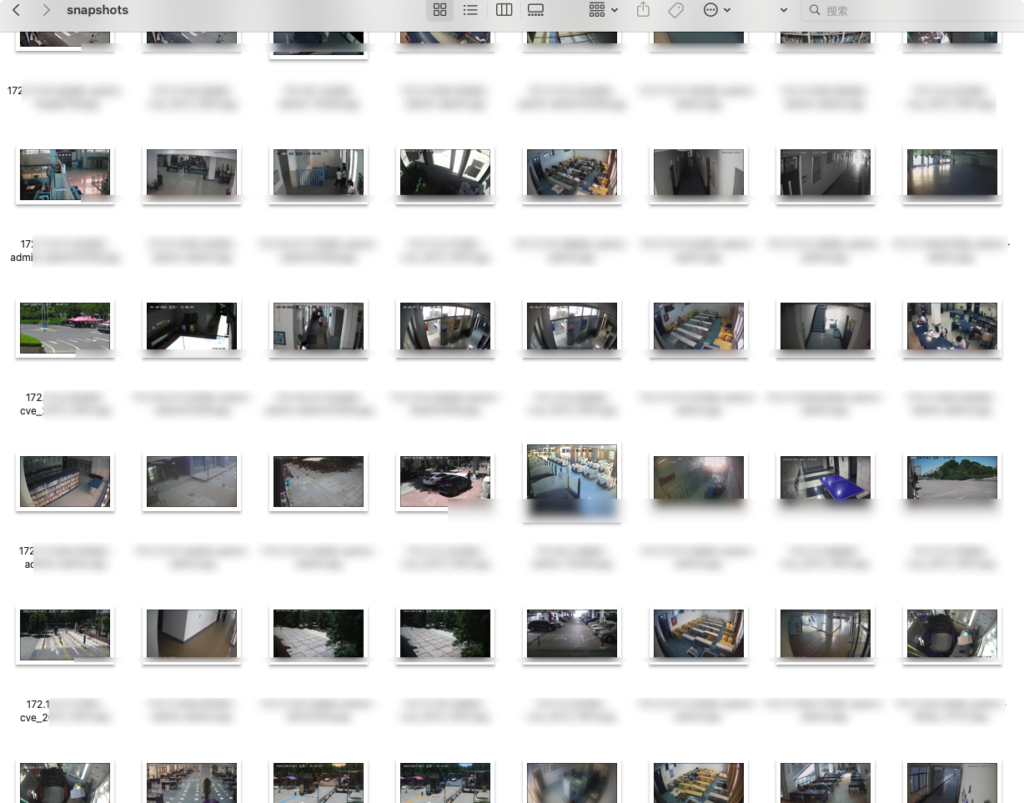
- snapshots Snapshots of some devices are saved in:
Disclaimer
This tool is for security testing only, and is strictly prohibited for illegal use, and the consequences have nothing to do with the team
Acknowledgments & Citations
Thanks to Aiminsun for CVE-2021-36260
Thanks to chrisjd20 for hikvision config file decryptor
Thanks to mcw0 for DahuaConsole
Thanks to jorhelp for Ingram